How To Repair Plastic Tanks – Washer Fluid Reservoir
April 15, 2022
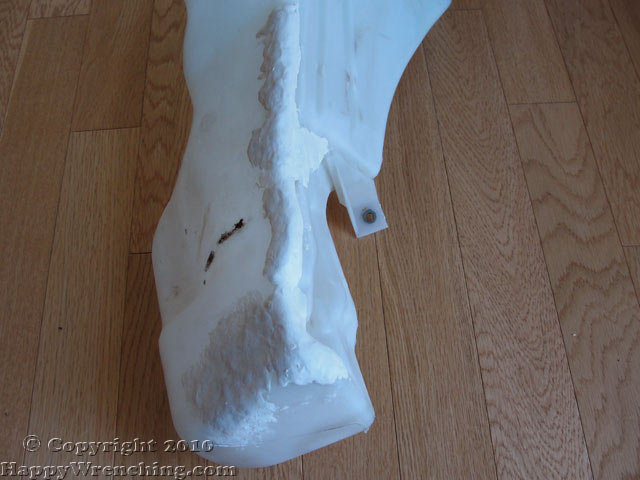
When I originally bought the Audi A4 it had a damaged front bumper along with a cracked windshield fluid reservoir. I completed this repair several months ago but wanted to wait before posting the article so that I could see how the repair was holding up. The washer bottle on the Audi was severely cracked – as you will see later on in the tutorial, the crack runs from top to bottom. In case you were wondering – yes, it does leak a couple of drops a day. However, most people will not be repairing a crack this big and I think they will get great results by following this tutorial.
When I originally bought the Audi A4 it had a damaged front bumper along with a cracked windshield fluid reservoir. I completed this repair several months ago but wanted to wait before posting the article so that I could see how the repair was holding up. The washer bottle on the Audi was severely cracked – as you will see later on in the tutorial, the crack runs from top to bottom. In case you were wondering – yes, it does leak a couple of drops a day. However, most people will not be repairing a crack this big and I think they will get great results by following this tutorial.
Preparing The Plastic Tank
The product that I used for this repair was called QuikSteel Plastic Tank Repair Kit made by CarGo. I think I paid about 8 bucks for it. It comes in clay form and you knead it for a couple of minutes until the clay begins to feel warm. At this point you several minutes to apply the clay before it begins to harden. 
1. First, prepare the tank by thoroughly washing it with soap. After it has been washed grab some coarse sandpaper and scrub the area around the crack. At this point you are ready to apply the quiksteel but I like to do one more step. Grab a soldering iron and with the crack closed, melt the two sides together. This does two things, it will hold the two sides and it provides a rough surface for the quiksteel to adhere to. Look at the picture below to see the final result. Notice the ridges all along the crack. 
Applying The QuickSteel
2. Cut a piece of the Quicksteel and begin to knead. Do this until the clay begins to feel warm. At this point you can apply the clay to the cracked surface. 
3. There is plenty of product even for heavily damaged items. This is what the windshield washer reservoir looked like when I was done with it. That was one big crack. Remember, once this stuff sets, it is hard as a rock. You can even sand it if you wanted to. 
0 Comments